Claude Code 作为 Anthropic 推出的 Agentic 编程工具,其核心能力在于一套精心设计的内置工具系统。本文会从协议层和实现层两个角度,剖析这些工具的设计理念与工程取舍。
本文主要想回答三个问题:
- 从 LLM 视角看,“调用工具” 在协议层面到底长什么样?
- Claude Code 为什么要用一整套专用工具替代
bash命令? - 这些内置工具在实现上做了哪些「为 LLM 优化」的工程决策?
一、工具系统概览#
Claude Code 提供了一套专门为代码开发场景优化的内置工具,大致可以分为三类:
| 类别 | 工具 | 用途 |
|---|---|---|
| 文件读取 | Read, Glob, Grep, LS | 读取、搜索、列出文件 |
| 文件写入 | Write, Edit, MultiEdit | 创建、修改文件 |
| 命令执行 | Bash | 执行 Shell 命令 |
这些工具的设计遵循一个核心原则:用专用工具替代通用 Bash 命令,以获得更好的性能、安全性和可控性。
系列相关文章:
- 本文:Claude Code 工具系统:内置工具的实现剖析(工具设计与实现细节)
- 下一篇:用 Google ADK 复现 Claude Code 工具系统(用 ADK 从零实现一套类似工具)
- 延伸阅读:Claude Agent SDK vs Google ADK:两种 Agent 开发范式的深度对比(从 SDK 视角看两家生态)
二、LLM 如何「调用」工具#
在深入具体工具之前,先把核心协议说清楚:LLM 不执行工具,它只生成结构化的调用描述,由客户端解析并执行。
从抽象上看,这就是一层 RPC over JSON:
- 客户端:声明可用「方法」(tools + schema)
- LLM:返回「要调用的方法名 + 参数」
- 客户端:本地执行,再把结果作为新的消息回传

上图是整个工具调用的数据流:从用户到 CLI,再到 Claude LLM,以及最终落到文件系统 / Bash / 外部工具的执行路径,一眼能看到各层的职责边界。
2.1 完整流程#
┌──────────────────┐     ┌──────────────────┐     ┌──────────────────┐
│   1. 发送请求     │ ──▶ │   2. LLM 生成     │ ──▶ │  3. 客户端执行    │
│   (带工具定义)    │     │   (结构化 JSON)   │     │  (真正调用工具)   │
└──────────────────┘ └──────────────────┘ └──────────────────┘2.2 客户端发送请求(带工具 Schema)#
客户端告诉 LLM:「你可以用这些工具,参数格式是这样的。」
// 发送给 Anthropic API 的请求(简化)
{
  "model": "claude-sonnet-4-20250514",
  "messages": [
    { "role": "user", "content": "查找包含 useState 的文件" }
  ],
  "tools": [                          // ← 工具定义(JSON Schema)
    {
      "name": "GrepTool",
      "description": "搜索文件内容...",
      "input_schema": {               // ← 告诉 LLM 参数格式
        "type": "object",
        "properties": {
          "pattern": { "type": "string", "description": "正则表达式" },
          "path": { "type": "string", "description": "搜索目录" },
          "include": { "type": "string", "description": "文件过滤" }
        },
        "required": ["pattern"]
      }
    }
  ]
}如果抽掉细节,可以压缩成一个极简伪代码版:
callLLM({
  tools: [ ToolSchema... ],
  messages: [...]
})

// LLM 返回:
assistant: tool_use(name="GrepTool", input={...})

// 客户端:
result = GrepTool.call(input)
sendToLLM(tool_result(result))2.3 LLM 生成结构化输出(不是执行)#
LLM 看到工具定义后,选择要调用的工具,并生成符合 schema 的 JSON 参数:
{
  "role": "assistant",
  "content": [
    {
      "type": "tool_use",              // ← 特殊的消息类型
      "id": "toolu_01ABC123",          // ← 唯一 ID(用于匹配结果)
      "name": "GrepTool",              // ← LLM 选择的工具名
      "input": {                       // ← LLM 生成的参数(符合 schema)
        "pattern": "useState",
        "include": "*.tsx"
      }
    }
  ],
  "stop_reason": "tool_use"            // ← 表示需要工具结果才能继续
}这里最重要的一点是:LLM 只是描述「我要调用什么 + 参数是什么」这件事,本身不触碰任何系统资源。
2.4 客户端解析并执行#
客户端收到响应后,解析 tool_use 块,找到本地实现并真正调用:
// 处理逻辑(伪代码)
for (const block of assistantMessage.content) {
  if (block.type === 'tool_use') {
    const toolName = block.name      // "GrepTool"
    const toolInput = block.input    // { pattern: "useState", include: "*.tsx" }
    const toolUseId = block.id       // "toolu_01ABC123"

    // 1. 查找对应的工具实现
    const tool = tools.find(t => t.name === toolName)

    // 2. 验证参数
    const isValid = tool.inputSchema.safeParse(toolInput)

    // 3. 真正执行工具代码
    for await (const result of tool.call(toolInput, context)) {
      // GrepTool.call() 内部可能是对 ripgrep 的一层封装
    }

    // 4. 把结果返回给 LLM
    yield createUserMessage([{
      type: 'tool_result',
      tool_use_id: toolUseId,        // ← 匹配之前的 tool_use
      content: "Found 15 files\n..."
    }])
  }
}2.5 将结果返回给 LLM#
工具执行完成后,结果作为新一轮请求的一部分发送给 LLM:
// 下一轮 API 请求(简化)
{
  "messages": [
    { "role": "user", "content": "查找包含 useState 的文件" },
    {
      "role": "assistant",
      "content": [
        { "type": "tool_use", "id": "toolu_01ABC123", "name": "GrepTool", "input": {...} }
      ]
    },
    {
      "role": "user",                  // ← tool_result 在协议里是 user 角色
      "content": [
        {
          "type": "tool_result",
          "tool_use_id": "toolu_01ABC123",
          "content": "Found 15 files\nsrc/App.tsx\nsrc/hooks/useAuth.tsx\n..."
        }
      ]
    }
  ]
}LLM 收到 tool_result 后,再继续生成自然语言回复或下一轮 tool_use。
2.6 小结:职责边界#
┌─────────────────────────────────────────────────────────────────────┐
│                                                                     │
│   LLM 的能力边界:                                                   │
│                                                                     │
│   1. 阅读工具定义(JSON Schema)                                     │
│   2. 决定是否需要调用工具                                            │
│   3. 生成符合 schema 的 JSON 参数                                    │
│   4. 等待客户端返回 tool_result                                      │
│   5. 根据结果继续生成回复                                            │
│                                                                     │
│   ─────────────────────────────────────────────────────────────     │
│                                                                     │
│   客户端负责实际「执行」:                                           │
│                                                                     │
│   1. 解析 LLM 返回的 tool_use JSON                                   │
│   2. 找到对应的工具实现                                              │
│   3. 调用 tool.call(input, context) 执行                            │
│   4. 将结果封装为 tool_result 返回给 LLM                             │
│                                                                     │
└─────────────────────────────────────────────────────────────────────┘打个比方:你的 CLI 定义的 Schema 就像是一张带格子的填空题试卷。
- 你(CLI):给 LLM 发这张试卷,说:“如果你想用 Grep,请把 pattern 和 path 填在格子里。”
- LLM:理解意图,乖乖把参数填进格子里(生成 JSON)。
- 你(CLI):收到试卷,先检查格子填没填对(验证 Schema),没问题再拿去跑代码。
本质上,LLM 的”工具调用”就是一种特殊的结构化输出格式,让 LLM 能够表达”我需要这个工具,参数是这些”的意图。。
2.7 完整实例:从用户输入到最终响应#
用一个具体例子走完整个关键路径:
场景:用户输入「帮我找出所有包含 useState 的 React 文件」。
Step 1: 用户输入 → CLI 构造请求#
用户在终端输入:
> 帮我找出所有包含 useState 的 React 文件CLI 将用户输入包装成 messages,并附上工具定义:
// CLI 发送给 Anthropic API 的请求(简化)
{
  "model": "claude-sonnet-4-20250514",
  "max_tokens": 16000,
  "system": "You are Claude Code, an AI assistant...",
  "messages": [
    {
      "role": "user",
      "content": "帮我找出所有包含 useState 的 React 文件"
    }
  ],
  "tools": [
    {
      "name": "GrepTool",
      "description": "搜索文件内容...",
      "input_schema": { /* JSON Schema */ }
    },
    // ... 更多工具
  ],
  "tool_choice": { "type": "auto" }
}Step 2: LLM 返回 tool_use#
{
  "role": "assistant",
  "content": [
    { "type": "text", "text": "我来帮你搜索包含 useState 的 React 文件。" },
    {
      "type": "tool_use",
      "id": "toolu_01XYZ",
      "name": "GrepTool",
      "input": {
        "pattern": "useState",
        "path": ".",
        "include": "*.tsx,*.jsx"
      }
    }
  ],
  "stop_reason": "tool_use"
}Step 3: CLI 执行工具#
// CLI 内部处理(伪代码)
const toolUse = response.content.find(b => b.type === 'tool_use');
const tool = tools.find(t => t.name === toolUse.name);  // GrepTool

// 执行工具(实际调用 ripgrep 的封装)
const result = await tool.call(toolUse.input, context);
// result.data = [
//   { file: "src/App.tsx", line: 5, content: "useState(0)" },
//   { file: "src/hooks/useAuth.tsx", line: 12, content: "useState(null)" },
// ]Step 4: CLI 发送 tool_result#
// CLI 发送的第二轮请求
{
  "messages": [
    { "role": "user", "content": "帮我找出所有包含 useState 的 React 文件" },
    {
      "role": "assistant",
      "content": [
        { "type": "text", "text": "我来帮你搜索..." },
        { "type": "tool_use", "id": "toolu_01XYZ", "name": "GrepTool", "input": {...} }
      ]
    },
    {
      "role": "user",
      "content": [{
        "type": "tool_result",
        "tool_use_id": "toolu_01XYZ",
        "content": "Found 8 matches:\nsrc/App.tsx:5: useState(0)\nsrc/hooks/useAuth.tsx:12: useState(null)\n..."
      }]
    }
  ]
}Step 5: LLM 生成最终回复#
{
  "role": "assistant",
  "content": [{
    "type": "text",
    "text": "找到了 8 个包含 useState 的 React 文件:\n\n1. **src/App.tsx** - 第 5 行\n2. **src/hooks/useAuth.tsx** - 第 12 行\n..."
  }],
  "stop_reason": "end_turn"
}流程图#
┌─────────────────────────────────────────────────────────────────────┐
│   用户: "帮我找出所有包含 useState 的 React 文件"                     │
└────────────────────────────┬────────────────────────────────────────┘
                             │
                             ▼
┌─────────────────────────────────────────────────────────────────────┐
│   CLI: 构造请求 { messages: [...], tools: [...] }                    │
└────────────────────────────┬────────────────────────────────────────┘
                             │ HTTP POST
                             ▼
┌─────────────────────────────────────────────────────────────────────┐
│   LLM: 返回 { type: "tool_use", name: "GrepTool", input: {...} }    │
└────────────────────────────┬────────────────────────────────────────┘
                             │
                             ▼
┌─────────────────────────────────────────────────────────────────────┐
│   CLI: 执行 GrepTool → 调用 ripgrep → 得到结果                        │
└────────────────────────────┬────────────────────────────────────────┘
                             │
                             ▼
┌─────────────────────────────────────────────────────────────────────┐
│   CLI: 发送 { type: "tool_result", content: "Found 8 matches..." }  │
└────────────────────────────┬────────────────────────────────────────┘
                             │ HTTP POST
                             ▼
┌─────────────────────────────────────────────────────────────────────┐
│   LLM: 返回 { type: "text", text: "找到了 8 个文件..." }             │
└────────────────────────────┬────────────────────────────────────────┘
                             │
                             ▼
┌─────────────────────────────────────────────────────────────────────┐
│   CLI: 显示给用户                                                    │
└─────────────────────────────────────────────────────────────────────┘
这张时序图把上面的 5 个步骤拉直成一条线,突出两次 HTTP 往返:第一次 LLM 决定调用工具,第二次在拿到
tool_result之后生成最终回复。
三、Tools → LLM API 数据流#
上面是协议层,这一节对齐到「代码分层」视角,看 Claude Code 工具系统从定义到调用的完整数据流。可以把它理解成一个典型的「Tool Registry + Query Engine」结构。
┌───────────────────┐
│  1. Tool 定义层    │
│  src/tools/*      │
└────────┬──────────┘
         │ 每个工具包含:
         │ • name: string
         │ • description: string
         │ • inputSchema: ZodSchema
         │ • call(): AsyncGenerator
         ▼
┌───────────────────────────────────────────────────────────────────────┐
│  2. Tool 聚合层                                                        │
│  getAllTools() → 返回所有工具数组                                      │
│  [TaskTool, BashTool, FileReadTool, FileEditTool, GrepTool, ...]      │
└────────┬──────────────────────────────────────────────────────────────┘
         │
         ▼
┌───────────────────────────────────────────────────────────────────────┐
│  3. 查询引擎(例如 query() / runConversation())                       │
│                                                                        │
│  • 维护消息历史                                                         │
│  • 拼接系统提示                                                         │
│  • 决定是否允许使用工具(canUseTool 回调)                              │
│  • 调用 LLM API 发送请求                                                │
└────────┬──────────────────────────────────────────────────────────────┘
         │
         ▼
┌───────────────────────────────────────────────────────────────────────┐
│  4. LLM 服务层(封装 SDK 调用)                                        │
│                                                                        │
│  🔧 Tool Schema 转换                                                    │
│  // Anthropic 格式                                                     │
│  const toolSchemas = tools.map(tool => ({                              │
│    name: tool.name,                                                    │
│    description: getToolDescription(tool),                              │
│    input_schema: zodToJsonSchema(tool.inputSchema)                     │
│  }))                                                                   │
│                                                                        │
│  📤 发送 API 请求                                                      │
│  anthropic.messages.create({                                           │
│    model, max_tokens, messages, system,                                │
│    tools: toolSchemas,        ← 工具 schema                            │
│    tool_choice: { type: 'auto' }                                       │
│  })                                                                    │
└────────┬──────────────────────────────────────────────────────────────┘
         │
         ▼
┌───────────────────────────────────────────────────────────────────────┐
│  5. LLM 响应 → Tool 调用                                               │
│                                                                        │
│  LLM 返回 tool_use 块:                                                 │
│  { type: 'tool_use', id: 'xxx', name: 'Bash', input: { command: '...' }}│
│                                                                        │
│  查询引擎执行:                                                          │
│  1. 查找工具: tool = tools.find(t => t.name === toolUse.name)          │
│  2. 验证输入: tool.inputSchema.safeParse(input)                        │
│  3. 检查权限: canUseTool(tool, input, context)                         │
│  4. 执行工具: tool.call(input, context)                                │
└────────┬──────────────────────────────────────────────────────────────┘
         │
         ▼
┌───────────────────────────────────────────────────────────────────────┐
│  6. Tool 结果 → LLM (tool_result)                                      │
│                                                                        │
│  工具执行后,结果封装为 tool_result 消息:                                │
│                                                                        │
│  yield createUserMessage([{                                            │
│    type: 'tool_result',                                                │
│    content: result.resultForAssistant || String(result.data),          │
│    tool_use_id: toolUseID,                                             │
│    is_error?: boolean                                                  │
│  }])                                                                   │
│                                                                        │
│  这个消息会被添加到消息历史,在下一轮查询时发送给 LLM                     │
└───────────────────────────────────────────────────────────────────────┘
这张分层图对应的就是上面的 ASCII 图:从 Tool 定义、聚合,到查询引擎、LLM 封装,再到底层的文件系统与 Shell,把「工具系统」放回到整个 Claude Code 架构里的位置。
可以看到:Claude Code 的工具系统,本质上是对 Anthropic Tool Calling 协议做了一层工程化包装和分层。
核心转换点#
| 转换 | 说明 |
|---|---|
| Zod → JSON Schema | zodToJsonSchema(tool.inputSchema) 将 Zod 类型转为 API 可用的 JSON Schema |
| 消息格式转换 | 封装 Anthropic/OpenAI 等不同 API 的消息格式差异 |
| 工具结果封装 | { type: 'tool_result', ... } 将执行结果返回给 LLM,统一放在 user 角色 |
四、文件读取类工具#
这些工具可以理解为:对文件系统相关 CLI 的「结构化封装层」,把原本非结构化的 stdout 变成稳定的 schema,方便 LLM 消化。

这张对照图把 Glob/Grep/Read/LS/Write/Edit/MultiEdit/Bash 分成三大类,并列出它们各自试图替代的传统 Shell 命令,以及这样做带来的好处。
4.1 Glob —— 快速文件模式匹配#
角色: 对 fast-glob / node-glob 一类库的薄封装,挂到统一 Tool 接口下。
const GlobTool = {
  name: "Glob",
  description: "基于 glob 模式快速查找文件",
  parameters: {
    pattern: {
      type: "string",
      description: "glob 模式,如 '**/*.ts' 或 'src/**/*.py'"
    },
    path: {
      type: "string",
      description: "搜索的根目录",
      default: "."
    }
  }
}为什么不用 find 或 ls -R?
- 性能:长生命周期进程 + 内部缓存,避免频繁 fork CLI
- gitignore 感知:自动跳过
.git、node_modules等目录 - 输出结构化:返回列表/JSON,而不是一坨文本
- 安全边界:受权限系统控制,限制工作目录范围
典型调用:
Glob pattern="**/*.test.ts" path="src"
→ 返回所有测试文件列表可以把它看成「把文件系统暴露给 LLM 的一个受控视图」。
4.2 Grep —— 内容搜索#
角色: ripgrep 的 JSON 包装器。
const GrepTool = {
  name: "Grep",
  description: "在文件中搜索匹配正则表达式的内容",
  parameters: {
    pattern: {
      type: "string",
      description: "正则表达式模式"
    },
    path: {
      type: "string",
      description: "搜索路径"
    },
    include: {
      type: "array",
      description: "包含的文件类型,如 ['*.ts', '*.py']"
    }
  }
}实现上通常就是起一个 rg 子进程,打开 --json 输出,然后流式解析:
async function executeGrep(params: GrepParams): Promise<GrepResult> {
  const args = [
    params.pattern,
    params.path,
    '--json',               // JSON 格式输出
    '--max-count', '50',    // 限制每个文件的匹配数
    '--max-filesize', '1M', // 跳过大文件
  ];

  if (params.include) {
    for (const glob of params.include) {
      args.push('--glob', glob);
    }
  }

  const result = await spawn('rg', args);
  return formatResults(result);
}为什么选择 ripgrep? 一个典型的工程取舍:
| 特性 | ripgrep | 传统 grep |
|---|---|---|
| 速度 | 极快(Rust 实现) | 一般 |
| Unicode | 默认支持 | 需要额外配置 |
| .gitignore | 自动遵守 | 不支持 |
| 输出格式 | 支持 JSON | 仅文本 |
换句话说:用成熟 CLI 解决 I/O 和搜索问题,用 Tool 层解决「协议和结构化」问题。
4.3 Read —— 文件内容读取#
设计目标: 安全、可控地读取文件内容,并为 LLM 输出做过格式优化。
const ReadTool = {
  name: "Read",
  description: "读取文件内容,支持行范围限制",
  parameters: {
    path: {
      type: "string",
      description: "文件路径"
    },
    offset: {
      type: "integer",
      description: "起始行号(从 0 开始)",
      default: 0
    },
    limit: {
      type: "integer",
      description: "最大读取行数",
      default: 2000
    }
  }
}async function executeRead(params: ReadParams): Promise<string> {
await checkReadPermission(params.path); // 权限检查
const stats = await fs.stat(params.path);
if (stats.size > MAX_FILE_SIZE) {
throw new Error('文件过大,请使用 offset/limit 分段读取');
}
const lines = await fs.readFile(params.path, 'utf-8');
return formatWithLineNumbers(lines, params.offset, params.limit);
}输出类似 cat -n:
     1  import { useState } from 'react';
     2
     3  export function Counter() {
     4    const [count, setCount] = useState(0);
     5    return <button onClick={() => setCount(c => c + 1)}>{count}</button>;
6 }为什么不直接用 cat / head / tail?
- 行号格式固定,方便后续引用「第 N 行」
- 对大文件强制分页,避免一次性读爆上下文
- 所有读取都走统一权限和审计链路
4.4 LS —— 目录列表#
const LSTool = {
  name: "LS",
  description: "列出目录内容",
  parameters: {
    path: {
      type: "string",
      description: "目录路径"
    },
    ignore: {
      type: "array",
      description: "忽略的模式",
      default: ["node_modules", ".git"]
    }
  }
}输出通常包含:
- 文件/目录名
- 类型(文件/目录/符号链接)
- 文件大小
- 最后修改时间
和 ls 相比,它把「视图」抽象成了一个稳定的 JSON schema,更适合作为 LLM 的长期记忆基础。
五、文件写入类工具#
这些工具把原本容易出错的 Shell 写入操作(重定向、heredoc、sed)抽象成显式意图 + 明确 schema,方便审计和回滚。
5.1 Write —— 文件写入#
const WriteTool = {
  name: "Write",
  description: "将内容写入文件。如果文件存在会被覆盖。",
  parameters: {
    path: {
      type: "string",
      description: "目标文件路径"
    },
    content: {
      type: "string",
      description: "要写入的内容"
    }
  }
}安全机制包括:
- 写入前走
can_use_tool等权限检查 - 建议配合
Read做「读 → 改 → 写」的完整链路 - 用临时文件 + rename 做原子写入,避免半写入状态
为什么不用 echo > 或 heredoc?
- 减少 Shell 转义相关的长尾 bug
- 可以做集中审计和 diff
- 行为可以稳定地在不同环境复现
5.2 Edit —— 精确编辑#
场景: 不希望覆盖整个文件,而是修改某段上下文。
const EditTool = {
  name: "Edit",
  description: "编辑文件的特定部分",
  parameters: {
    path: {
      type: "string",
      description: "文件路径"
    },
    old_string: {
      type: "string",
      description: "要替换的原内容"
    },
    new_string: {
      type: "string",
      description: "替换后的新内容"
    }
  }
}async function executeEdit(params: EditParams): Promise<EditResult> {
const content = await fs.readFile(params.path, 'utf-8');
const count = (content.match(new RegExp(escapeRegex(params.old_string), 'g')) || []).length;
if (count === 0) {
throw new Error('未找到要替换的内容');
}
if (count > 1) {
throw new Error(`找到 ${count} 处匹配,请提供更精确的上下文`);
}
const newContent = content.replace(params.old_string, params.new_string);
await fs.writeFile(params.path, newContent, 'utf-8');
return { success: true, path: params.path };
}和 sed 相比,换了一组工程取舍:
- 要求上下文完全匹配,牺牲灵活性换安全
- 多处命中直接报错,强迫调用方提供更精确的 diff
- 更容易和「审阅 diff → 批准执行」流整合
5.3 MultiEdit —— 批量编辑#
在一次调用中,对多个文件或同一文件的多处同时修改:
const MultiEditTool = {
  name: "MultiEdit",
  description: "批量编辑多个位置",
  parameters: {
    edits: {
      type: "array",
      items: {
        type: "object",
        properties: {
          path: { type: "string" },
          old_string: { type: "string" },
          new_string: { type: "string" }
        }
      }
    }
  }
}典型用法:
- 批量更新 import 路径
- 重命名某个 hook 在多处的调用
- 同步修改接口定义及其所有实现
可以视作 Edit 的「事务化版」。
六、命令执行工具#
6.1 Bash —— Shell 命令执行#
角色定位: 一个受控的「逃生阀」(escape hatch):专用工具覆盖不到的长尾场景,交给 Bash 兜底。
const BashTool = {
  name: "Bash",
  description: "在持久化 Bash 会话中执行命令",
  parameters: {
    command: {
      type: "string",
      description: "要执行的命令"
    },
    timeout: {
      type: "integer",
      description: "超时时间(毫秒)",
      default: 30000
    },
    background: {
      type: "boolean",
      description: "是否在后台运行",
      default: false
    }
  }
}关键特性:
- 持久化会话:
cd等命令的效果在会话内保留 - 输出截断:对 stdout/stderr 做长度限制
- 后台执行:支持长时间运行的命令
- 超时控制:避免单次调用卡死会话
async function executeBash(params: BashParams): Promise<BashResult> {
  if (isBlockedCommand(params.command)) {
    throw new Error('该命令已被安全策略禁止');
  }

  await checkBashPermission(params.command);

  const result = await sandbox.exec(params.command, {
    timeout: params.timeout,
    background: params.background,
  });

  return truncateOutput(result, MAX_OUTPUT_SIZE);
}何时用 Bash,何时用专用工具?
| 场景 | 推荐工具 |
|---|---|
| 搜索文件内容 | Grep(而非 bash: grep) |
| 查找文件 | Glob(而非 bash: find) |
| 读取文件 | Read(而非 bash: cat) |
| 写入文件 | Write(而非 bash: echo >) |
| 编辑文件 | Edit(而非 bash: sed) |
| 运行测试 | Bash(npm test 等) |
| Git 操作 | Bash(git status, git commit 等) |
| 安装依赖 | Bash(pip install, npm install 等) |
从架构角度看:Bash 用来处理不可预期的长尾;专用工具负责把高频路径标准化和结构化。
七、工具系统的设计哲学#
7.1 专用工具 > 通用命令#
Claude Code 的一个明显取舍是:为常见操作提供专用工具,而不是完全依赖通用 Shell 命令。
这样做带来几件事:
- 输入/输出 schema 明确,可验证、可演进
- 安全策略可以精确到「某个工具 + 某类参数」
- 输出可以围绕「token 成本」定制,而不是被 CLI 格式绑死
- 避免转义、locale 等 Shell 细节造成的随机失败
这和很多 Agent 框架里的做法类似:常见能力抽象成一阶 API,Shell 退到二线兜底。
7.2 权限分层#
工具调用走一条完整的权限链:
用户配置 → PermissionMode → can_use_tool 回调 → 工具执行
           (全局档位)        (细粒度控制)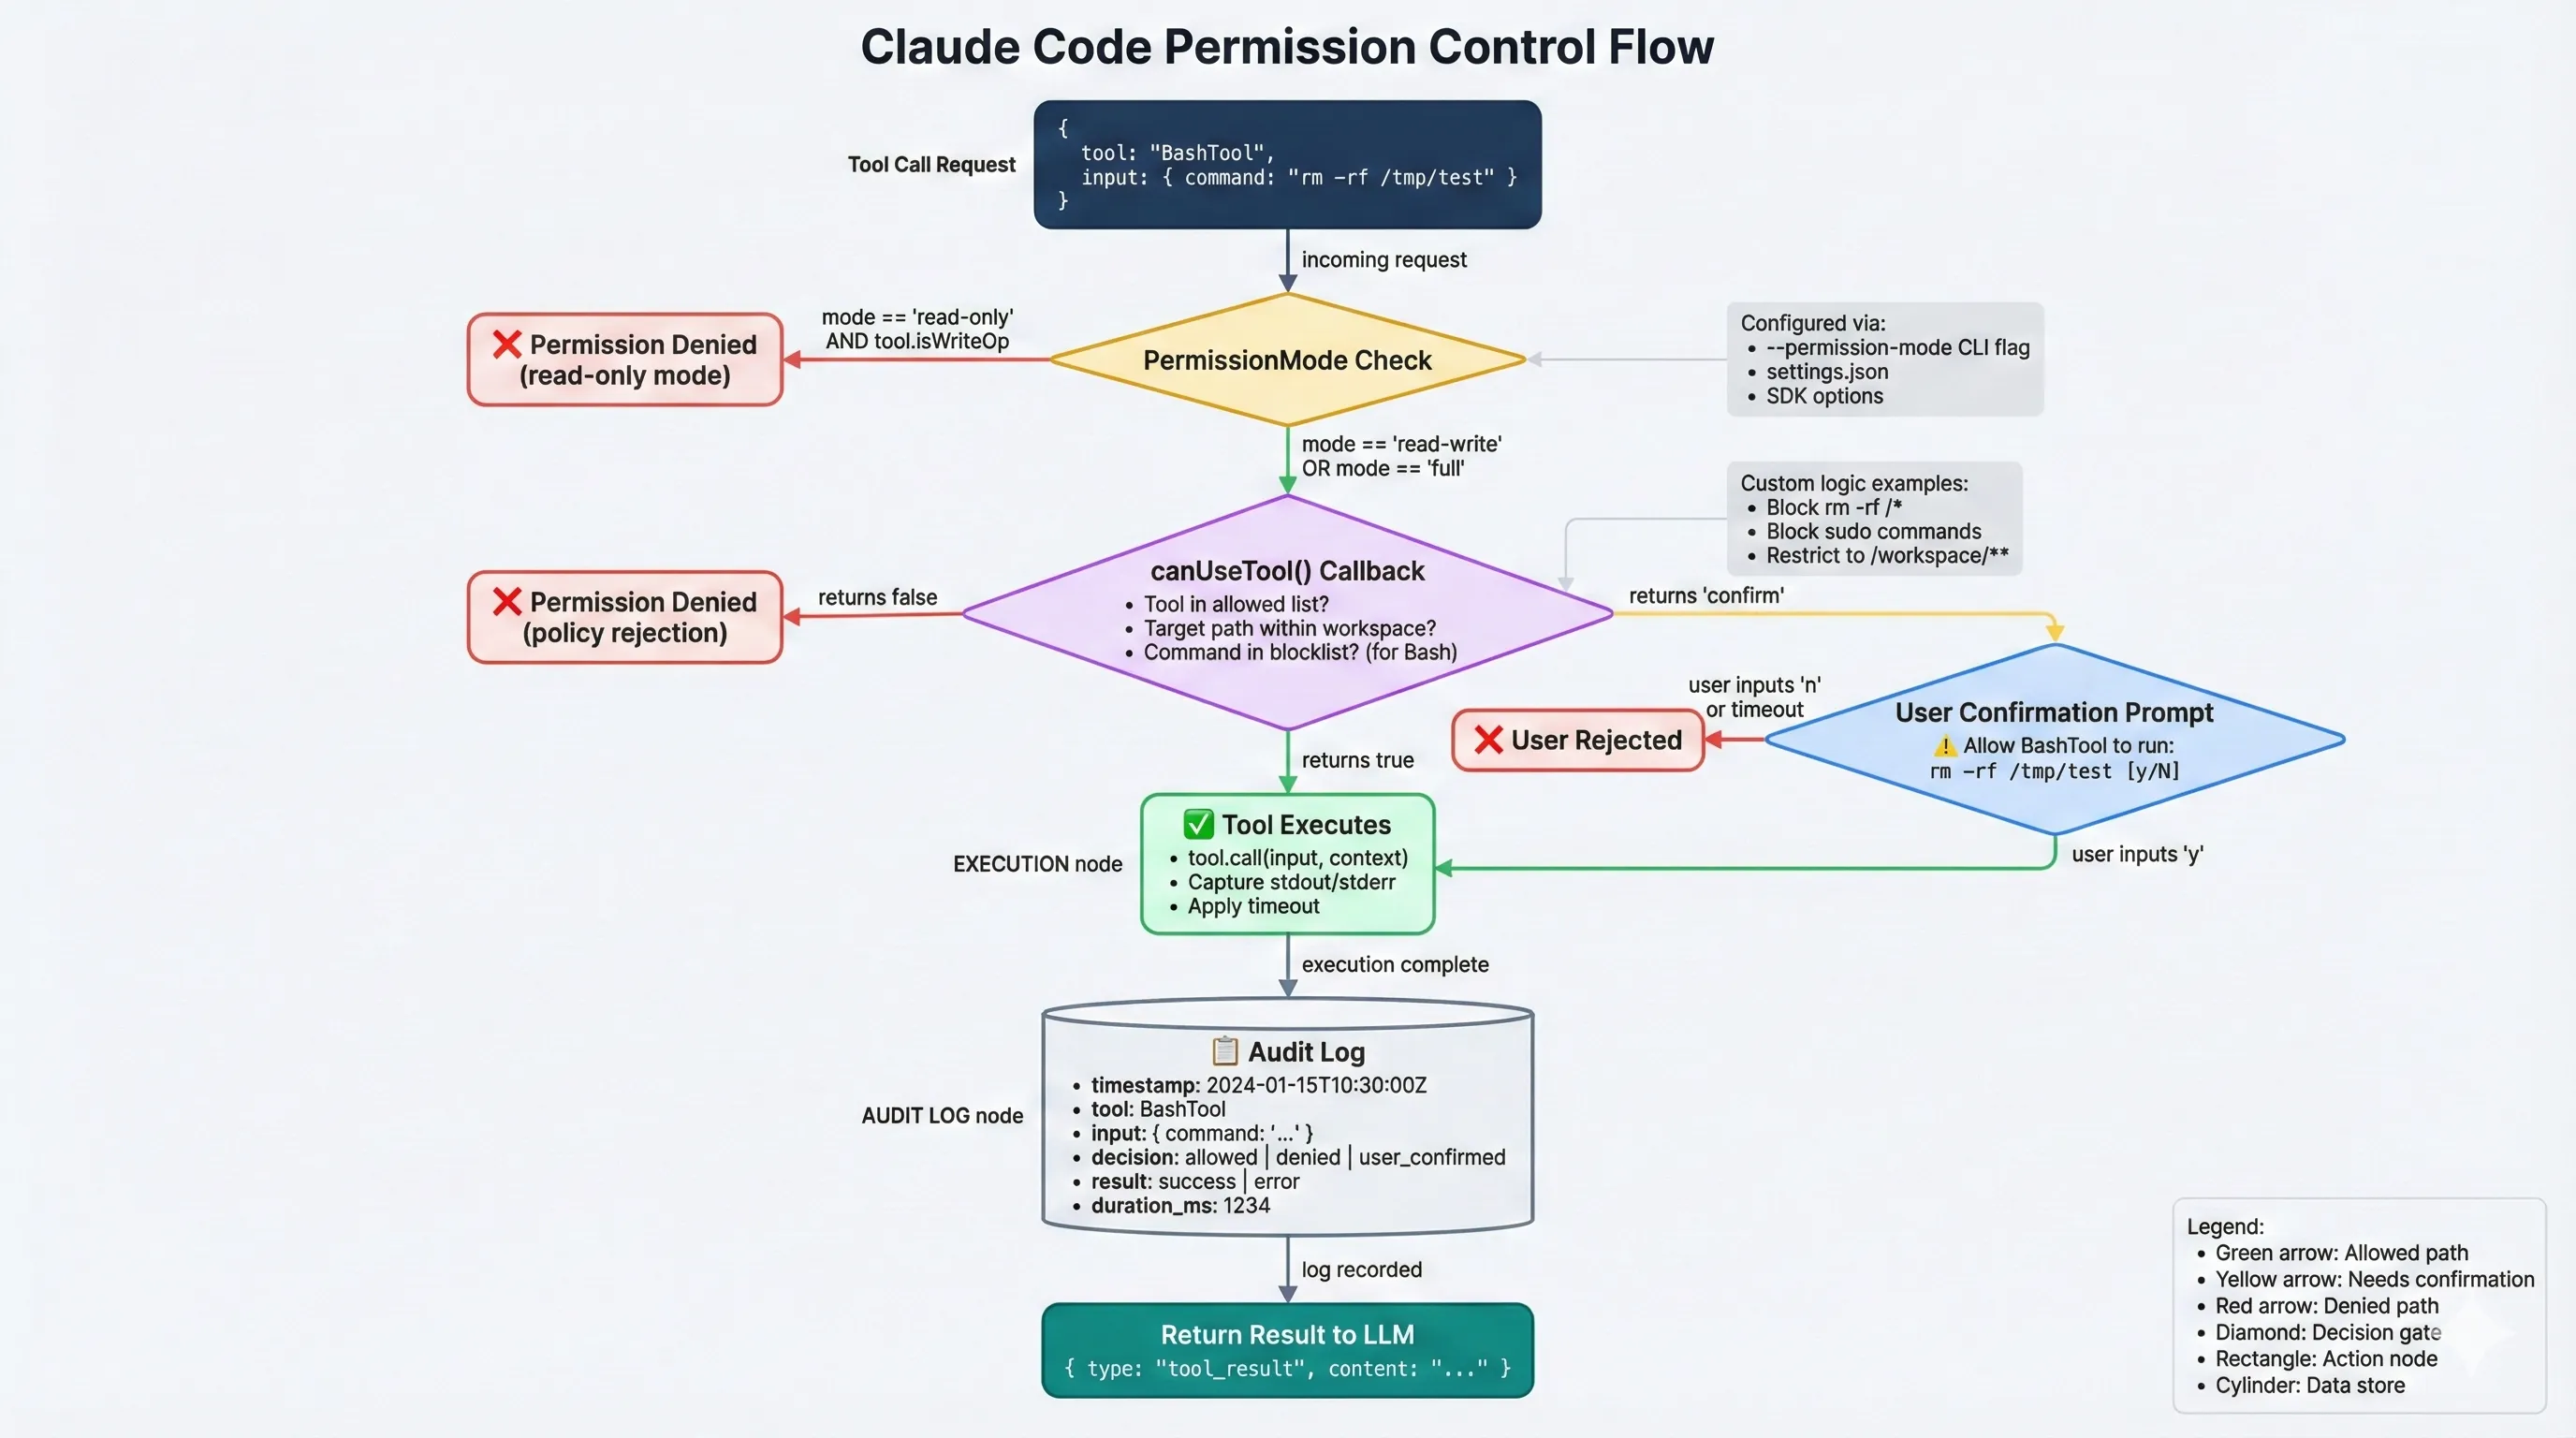
权限流转图把三道「闸门」画清楚了:全局 PermissionMode、
can_use_tool的策略判断,以及必要时的用户确认,对应你在 CLI 设置、安全策略和交互确认三个层面可以做的约束。
- PermissionMode 决定大致「可操作范围」(只读 / 读写 / 允许 Bash)
can_use_tool可以按工具名、路径、命令内容做更细粒度控制
7.3 输出优化#
每个工具都会对输出来一轮「LLM 视角」的精简:
- 尽量返回结构化 JSON 或约定好的文本格式
- 对大输出做截断和分页(Read/Grep/Bash 都有)
- 文件内容带行号,方便后续引用和 diff
这其实就是在「I/O 形状」上做了很多为 LLM 量身定制的工作。
八、扩展:自定义工具#
内置工具是一套「基础设施」,但 Claude Code 也支持通过 MCP(Model Context Protocol) 或自定义脚本扩展能力:
// 通过 MCP 添加自定义工具
const options = {
  mcp_servers: {
    "my-tools": {
      command: "node",
      args: ["./my-mcp-server.js"],
    }
  }
};可以用它来挂接:
- 数据库查询工具
- 各种内部 HTTP API
- 项目特定的构建 / 部署 / 运维命令
从架构上看,内置工具 + MCP 工具,共同构成了 Claude Code 的「工具平面」(tooling plane)。
九、总结#
从实现和协议两个层面看,Claude Code 的工具系统体现了 Anthropic 在 Agent 设计上的几个核心取向:
- 专用化:为高频操作提供专用工具,抽象出稳定 API,而不是让 LLM 在 Bash 上裸奔。
- 安全性:多层权限控制 + 明确的调用链,所有操作都有迹可循。
- 效率优化:I/O 形状围绕 token 成本设计,比如行号、分页、截断、JSON 输出。
- 可扩展性:通过 MCP / 自定义脚本,把项目私有能力也纳入同一套工具协议。
下一篇会沿着这个抽象继续往下看:MCP 协议是怎么把「远程服务」变成 Claude Code 眼中的一个个工具的。
本文基于 Claude Code 公开文档和社区资料整理。如有错漏,欢迎指正。